
A
selection of paint brushes, an airbrush (not essential), black undercoat
(spray paint or airbrush paint), a selection of Citadel Colour, plus
Foundation paints plus Washes (mentioned at each stage of the
tutorial), plenty of clean water, and a lamp with daylight bulb for
painting and patience.
Steps 1 and 2 – The objective markers were undercoated black using Vallejo Black Primer and then given a basecoat of Citadel colour “Dark Flesh (Doombull brown)”. Both coats of paint were applied using an airbrush, however you can easily undercoat your objective markers using any one of the many black spray paints available on the market, and the basecoat of Dark Flesh can be applied using a paintbrush as normal.

Step 3 – After all of the
objective markers are undercoated, basecoated and have dried, it’s time to
apply an “overbrush” to each of the objective markers. Mix together
Citadel “Catachan Green (Castellan Green)” and Citadel “Camo Green (Elysian Green)” paint in equal parts (50%
Catachan and 50% Camo green). Once mixed, heavily overbrush the objective
markers using a large drybrush. This should result in the objective markers
looking like the picture to the left. The green overbrush makes the sand look sickly
and leaves some of the base colour showing through.

Step 4 – Next apply pure Citadel “Camo Green” paint to the objective markers by drybrushing with a large drybrush.

Steps 5 and 6 - Next
drybrush the objective markers with Citadel “Rotting Flesh (Nurgling Green)” paint. Once this is
dry you can then drybrush the markers with a final light coat of Citadel
“Bleached Bone (Ushabti Bone)” paint.


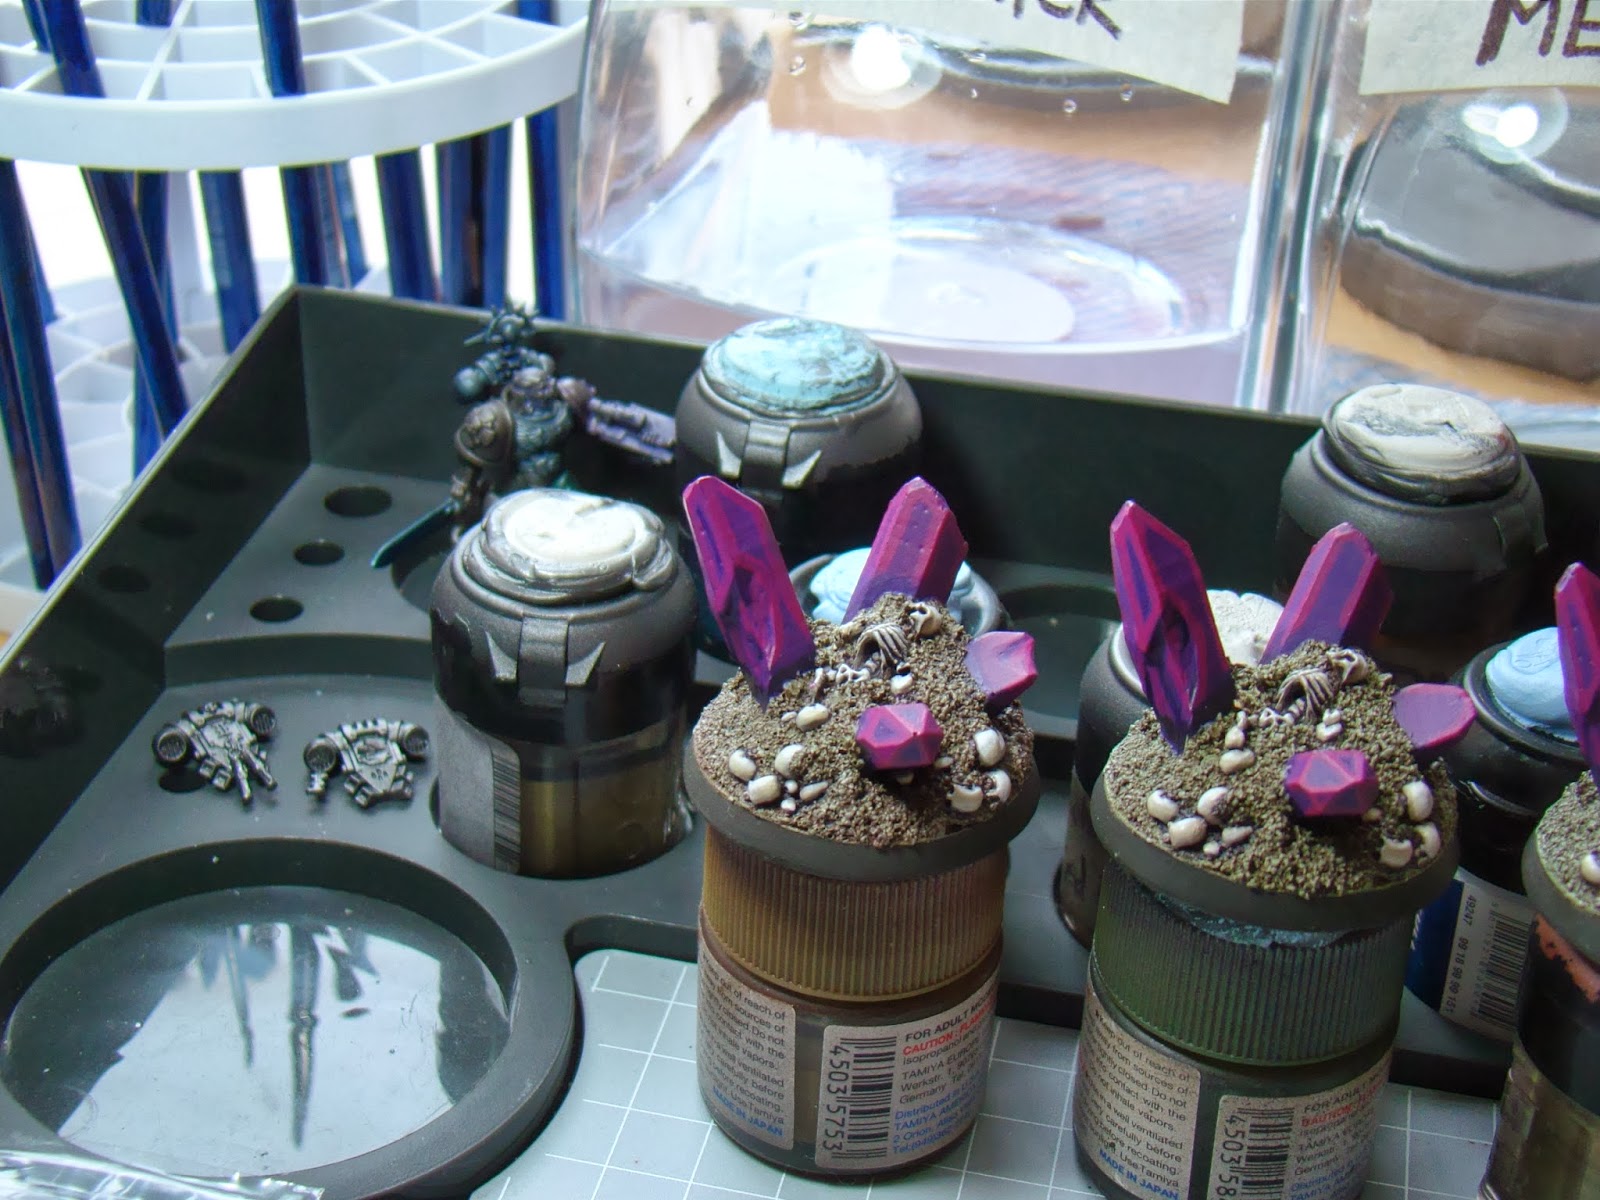
Steps 7 and 8 – Next paint the rim of the base with a coat or two of the Citadel Foundation Paint “Charadon Granite (Stormvermin Fur)” and the crystals with an undercoat of the Citadel Foundation Paint “Hormagaunt Purple (Daemonette Hide)". After the rim and crystals are painted, basecoat the skulls and bones with “Khemri Brown (Baneblade Brown"), another Citadel Foundation Paint. Once the skulls and bones are dry, you’ll need to wash them twice. First with a wash mixed using 50% “Scorched Brown (Rhinox Hide)” and 50% “Chaos Black (Abaddon Black)”, then wash them with the Citadel Wash “Leviathan Purple (Druchii Violet)”.

Step 9 – Once you’ve basecoated and washed the skulls and bones, you’ll need to make a mix made up of 50% “Khemri Brown” and 50% “Bleached Bone”. This is then carefully applied to the skulls and bones in several thin, watered down coats, leaving some of the dark base colour showing through at the edges.

Steps 10 and 11 – After applying the first highlight of 50% Khemri Brown and 50% Bleached Bone, continue highlighting the skulls and bones firstly using pure Bleached bone and then after the bleached bone highlight has dried. Highlight the skulls and bones again with a mix of 50% Citadel “Skull White (White Scar)” and "Bleached Bone". The key to highlighting is to leave some of the previous colour showing through as you go.


Steps 12 and 13 – The final highlight of pure "Skull White" is applied selectively to areas on the bones and skulls. Once all the highlights are complete and have dried, create a glaze made up of 50% Citadel Wash "Leviathan Purple (Druchii Violet)" and 50% Citadel Wash "Devlan Mud (Agrax Earthshade)", by mixing the two washes together and then adding water until the mix is almost transparent or looks like coloured water. This glaze is then applied onto all objective markers with the exception of the crystals and helps tie all the layers of colour together.

Steps 14 and 15 -
Now that the skulls and bones and the base have been completed we move onto the
crystals themselves. Firstly apply Citadel “Liche Purple (Xereus Purple)” paint to each
crystal. This will need to be done in two or three thinned down coats for a
smooth finish. Then carefully apply Citadel “Warlock Purple (Screamer Pink)” paint to the
edges of and any areas of the crystal you want to reflect light. Again this
should be done using two or three thin coats to give a smooth finish.


Step 16 – Once the paint from steps 14 and 15 has dried, create a mix of 50% Warlock Purple and 50% Bleached Bone. Carefully apply this to the areas you’ve highlighted with Warlock Purple in step 15. As you can see by the photo you’ll need to use a Fine Detail or smaller brush to apply the paint in what equates to thin strips of colour to ensure you can still see the previous colour too.


Step 17 – Using pure Skull White and a Fine Detail or smaller brush, carefully apply dots or little lines to edges, corners, tips or areas of the crystal where you have highlighted before. This is to represent light reflecting on the crystal. Again as the picture shows, this means being selective where you apply the paint and will require a steady hand.

Step 18 – Once you’ve completed steps 14 to 17 and you’re happy with how you’ve highlighted the crystals, you need to tie them all together with another glaze. The glaze is made from the following Citadel washes “Asurmen Blue (Drakenhof Nightshade), Baal Red (Carroburg Crimson) and Leviathan Purple.
You can create the glaze by mixing equal parts of the washes together and then watering the mix down until it’s like coloured water. Then apply it all over the crystals. This needs to be done carefully as you do not want the glaze to end up all over the skulls and base.

Step 19 - Finally to complete the crystals, mix together Citadel Gloss Varnish or ” ‘Ardcoat” with a small amount of Liche Purple. (You will not need a lot of Liche Purple to give the gloss varnish a slight purple hue.) Once mixed carefully apply this to the crsytals. Once dry it will, like the final glaze, help tie together all the colours of the crystals, will make them shiny (well they are crystals after all) and will protect them in the future.
.jpg)
And that’s it! They are complete and ready to be used on your table top battlefield.
No comments:
Post a Comment